
Lincoln Aviator: Engine / Engine Cooling - 3.0L EcoBoost
- Specifications
- Description and Operation - Engine Cooling - Component Location
- Description and Operation - Engine Cooling - System Operation and Component Description
- Diagnosis and Testing - Cooling Fan Control
- Diagnosis and Testing - Engine Cooling
- Diagnosis and Testing - Engine Temperature
- General Procedures - Engine Cooling System Draining, Vacuum Filling and Bleeding
- General Procedures - Engine Cooling System Flushing
- Removal and Installation - Block Heater
- Removal and Installation - Coolant Outlet Connector
- Removal and Installation - Coolant Pump
- Removal and Installation - Cooling Fan Motor and Shroud
- Removal and Installation - Cooling Module
- Removal and Installation - Cylinder Head to Coolant Outlet Connector Hose Assembly
- Removal and Installation - Degas Bottle
- Removal and Installation - Radiator
- Removal and Installation - Thermostat
- Removal and Installation - Transmission Fluid Heater Coolant Control Valve
 Installation - Engine Block Skirt Stiffener
Special Tool(s) /
General Equipment
205-153
(T80T-4000-W)
Handle
303-1246Engine Spreader BarTKIT-2006UF-FLMTKIT-2006UF-ROW
303-1247VCT Spark Plug Tube Seal Remover and InstallerTKIT-2006UF-FLMTKIT-2006UF-ROW
303-1250Seal Installer, Rear MainTKIT-2006UFFLM
303-1531Installer, Front Crank Seal and Damper
303-1634Lift Eyes (2)TKIT-2014D-ROW3TKIT-2014D-FL_ROW
303-335
(T88T-6701-A)
Installer, Front Cover Oil SealTKIT-1988-FLMTKIT-1988-F
Floor Crane
Mounting Stand
Plastic Scraper
Flat-Bladed Screwdriver
Vise
Vise Jaw Protectors
Materials
Name
Specification
Motorcraft® High Performance Engine RTV SiliconeTA-357
WSE-M4G323-A6
Motorcraft® Silicone Gasket RemoverZC-30-A
-
Motorcraft® Metal Surface Prep WipesZC-31-B
-
Motorcraft® Metal Brake Parts CleanerPM-4-A, PM-4-B
-
NOTICE:
During engine repair procedures, cleanliness is extremely
important...
 Specifications
Lubricants, Fluids, Sealants and Adhesives
Name
Specification
Fill Capacity
Motorcraft® Yellow Concentrated Antifreeze/CoolantVC-13-G
WSS-M97B57-A1
16...
Other information:
Lincoln Aviator 2020-2026 Owners Manual: Air Conditioning System
WARNING: The air conditioning refrigerant system contains refrigerant under high pressure. Only qualified personnel should service the air conditioning refrigerant system. Opening the air conditioning refrigerant system can cause personal injury...
Lincoln Aviator 2020-2026 Service Manual: General Procedures - Clockspring Adjustment
Special Tool(s) / General Equipment Adhesive Tape WARNING: If the clockspring is not correctly centralized, it may fail prematurely. If in doubt, repeat the centralizing procedure. Failure to follow these instructions may increase the risk of serious personal injury or death in a crash...
Categories
- Manuals Home
- Lincoln Aviator Owners Manual
- Lincoln Aviator Service Manual
- Configuring The Head Up Display
- Garage Door Opener
- Interior Lamps
- New on site
- Most important about car
Fastening the Seatbelts
The front outboard and rear safety restraints in the vehicle are combination lap and shoulder belts.
Insert the belt tongue into the proper buckle (the buckle closest to the direction the tongue is coming from) until you hear a snap and feel it latch. Make sure that you securely fasten the tongue in the buckle.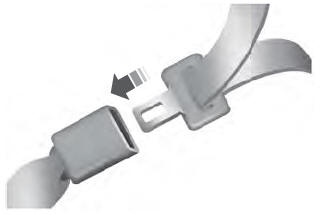

Copyright © 2026 www.liaviator2.com