
Lincoln Aviator: Seatbelt Systems / General Procedures - Locked Seatbelt Retractor Releasing
Repair
NOTE: If the seatbelt webbing does not extract from the seatbelt retractor from the stowed position, this may be due to a normal condition which happens when the seatbelt retracts at a high rate of speed. Follow these steps to release the seatbelt.
Front row seatbelt retractor
NOTE: Typical front outboard seatbelt retractor shown, other configurations similar.
NOTE: To unlock the seatbelt retractor, only a few millimeters of seatbelt are necessary to retract back onto the seatbelt retractor spool.
-
Slowly lower the seatbelt shoulder height adjuster
allowing the seatbelt to retract back onto the seatbelt retractor spool.
If the seatbelt shoulder height adjuster is all the way down, proceed
to step 3.
.jpg) |
-
Slowly extract the seatbelt from the seatbelt
retractor. If the seatbelt does not extract, proceed to the next step.
.jpg) |
-
Firmly pull and extract as much seatbelt from the seatbelt retractor as possible.
|
-
-
Slowly feed the seatbelt slack back into the retractor to unlock it.
-
Slowly extract the seatbelt from the seatbelt retractor. If the seatbelt does not extract, proceed to the next step. If the seatbelt does extract, proceed to step 8.
-
Slowly feed the seatbelt slack back into the retractor to unlock it.
-
Remove the fastener and detach the seatbelt anchor
or seatbelt anchor and pretensioner. REFER to the appropriate removal
and installation procedure in this section.
-
-
Slowly feed the seatbelt slack back into the retractor to unlock it.
-
Slowly extract the seatbelt from the seatbelt retractor. Proceed to the next step.
-
Slowly feed the seatbelt slack back into the retractor to unlock it.
.jpg) |
-
-
If the seatbelt does not extract, install
a new seatbelt retractor. Refer to the appropriate seatbelt retractor
removal and installation procedure in this section.
-
If the seatbelt does extract, install all
fasteners that were removed and tighten them to specification. REFER to
the appropriate removal and installation procedure.
-
If the seatbelt does not extract, install
a new seatbelt retractor. Refer to the appropriate seatbelt retractor
removal and installation procedure in this section.
-
Check the active restraint system for correct operation by carrying out the appropriate functional test.
Refer to: Seatbelt Systems (501-20A Seatbelt Systems, Diagnosis and Testing).
Rear seatbelt retractor
NOTE: Typical rear outboard seatbelt retractor shown, other configurations similar.
NOTE: To unlock the seatbelt retractor, only a few millimeters of seatbelt are necessary to retract back onto the seatbelt retractor spool.
-
Slowly pull the seatbelt out as far out as possible.
.jpg) |
-
-
NOTE: Compressing the backrest foam and/or reclining the rear seat backrest (if equipped) allows more slack of the seatbelt webbing to be fed into the seatbelt retractor.
Compress the backrest foam pad and recline the rear seat backrest (if equipped).
-
Slowly feed the seatbelt slack back into the
retractor to unlock it. If the seatbelt does not extract after carrying
out this step, proceed to the next step.
-
.jpg) |
-
Firmly pull and extract as much seatbelt from the seatbelt retractor as possible.
|
-
-
Slowly feed the seatbelt slack back into the retractor to unlock it.
-
Slowly extract the seatbelt from the seatbelt retractor. If the seatbelt does not extract, proceed to the next step. If the seatbelt does extract, proceed to step 16.
-
Slowly feed the seatbelt slack back into the retractor to unlock it.
-
Remove the fastener and detach the seatbelt anchor
or inflatable seatbelt union (if equipped). REFER to the appropriate
removal and installation procedure in this section.
-
-
Slowly feed the seatbelt slack back into the retractor to unlock it.
-
Extract the seatbelt webbing from the seatbelt retractor. Proceed to the next step.
-
Slowly feed the seatbelt slack back into the retractor to unlock it.
.jpg) |
-
-
If the seatbelt does not extract, install
a new seatbelt retractor. Refer to the appropriate seatbelt retractor
removal and installation procedure in this section.
-
If the seatbelt does extract, install all
fasteners that were removed and tighten them to specification. REFER to
the appropriate removal and installation procedure.
-
If the seatbelt does not extract, install
a new seatbelt retractor. Refer to the appropriate seatbelt retractor
removal and installation procedure in this section.
-
Check the active restraint system for correct operation by carrying out the appropriate functional test.
Refer to: Seatbelt Systems (501-20A Seatbelt Systems, Diagnosis and Testing).
 Diagnosis and Testing - Seatbelt Systems
Symptom Chart(s)
Preliminary Inspection
Diagnostics in this manual assume a certain skill level and knowledge of Ford-specific diagnostic practices...

Other information:
Lincoln Aviator 2020-2026 Service Manual: Diagnosis and Testing - Transmission Cooling
Diagnostic Trouble Code (DTC) Chart Diagnostics in this manual assume a certain skill level and knowledge of Ford-specific diagnostic practices. REFER to: Diagnostic Methods (100-00 General Information, Description and Operation). Diagnostic Trouble Code Chart Module DTC Description Action PCM P1783:00 Transmission Overtemperature Condition: No Sub Type Information GO to Pinpoint Test B PCM P2681:00 Engine Coolant Bypass Valve A Control Circuit/Open: No Sub Type Information GO to Pinpoint Test A PCM P2683:00 Engine Coolant Bypass Valve A Control Circuit High: No Sub Type Information GO to Pinpoint Test A Inspection and Verification NOTICE: When internal wear/damage occurs in the transmission, metal particles, clutch plate material and band material can travel into the torque converter, the transmission fluid cooler tubes, the transmission fluid cooler, the transmission fluid warmer (if equipped), and the cooler bypass valve (if equipped)...
Lincoln Aviator 2020-2026 Owners Manual: Heated Rear Window and Heated Exterior Mirrors
Heated Rear Window Press the button to clear the rear window of thin ice and fog. The heated rear window turns off after a short period of time. Note: Do not use harsh chemicals, razor blades or other sharp objects to clean or remove decals from the inside of the heated rear window...
Categories
- Manuals Home
- Lincoln Aviator Owners Manual
- Lincoln Aviator Service Manual
- Configuring The Head Up Display
- Tire Change Procedure
- Body and Paint
- New on site
- Most important about car
Child Seats
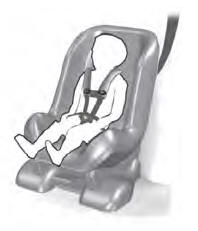
Use a child restraint (sometimes called an infant carrier, convertible seat, or toddler seat) for infants, toddlers and children weighing 40 lb (18 kg) or less (generally four-years-old or younger).
Using Lap and Shoulder Belts
WARNING: Do not place a rearward facing child restraint in front of an active airbag. Failure to follow this instruction could result in personal injury or death.
