Lincoln Aviator 2020-2025 Service Manual / Powertrain / Fuel System - General Information / Fuel System - General Information - 3.0L EcoBoost / General Procedures - Fuel System Pressure Release
Lincoln Aviator: Fuel System - General Information - 3.0L EcoBoost / General Procedures - Fuel System Pressure Release
Pressure release
-
With the vehicle in NEUTRAL, position it on a hoist.
Refer to: Jacking and Lifting (100-02 Jacking and Lifting, Description and Operation).
-
-
Remove the fasteners.
-
Remove the fasteners.
.jpg) |
-
-
Remove the nuts.
Torque: 53 lb.in (6 Nm)
-
Remove the screw.
Torque: 22 lb.in (2.5 Nm)
-
Remove the nuts.
.jpg) |
-
Disconnect the fuel pump control module electrical connector.
.jpg) |
-
Start the engine and allow it to idle until it stalls.
-
After the engine stalls, crank the engine for
approximately 5 seconds to make sure the fuel rail pressure has been
released.
-
Turn the ignition switch to the OFF position.
-
Disconnect battery ground cable.
Refer to: Battery Disconnect and Connect (414-01 Battery, Mounting and Cables, General Procedures).
-
When the fuel system service is complete, reconnect the fuel pump control module electrical connector.
.jpg) |
-
-
Install the fasteners.
-
Install the fasteners.
.jpg) |
-
-
Install the nuts.
Torque: 53 lb.in (6 Nm)
-
Install the screw.
Torque: 22 lb.in (2.5 Nm)
-
Install the nuts.
.jpg) |
-
Reconnect battery ground cable.
Refer to: Battery Disconnect and Connect (414-01 Battery, Mounting and Cables, General Procedures).
-
Cycle the ignition key and wait 3 seconds to pressurize
the fuel system. Check for leaks before starting the engine.
-
When service on the high pressure fuel system (high
pressure pump, fuel injectors and fuel rail) is completed, start the
engine and check for leaks.
 General Procedures - Spring Lock Couplings
Special Tool(s) /
General Equipment
310-250Disconnect Tool, Fuel LineTKIT-2012A-FLTKIT-2012A-ROW
Disconnect
NOTICE:
When reusing liquid or vapor tube connectors, make sure to
use compressed air to remove any foreign material from the connector
retaining clip area before separating from the tube or damage to the
tube or connector retaining clip can occur...
 General Procedures - Quick Release Coupling
Disconnect
NOTICE:
When reusing liquid or vapor tube connections, make sure to
use compressed air to remove any foreign material from the connector
retaining clip area before separating from the tube or damage to the
tube or connector retaining clip may occur...
Other information:
Lincoln Aviator 2020-2025 Service Manual: Description and Operation - F Clutch
Overview Item Description 1 SSF 2 F clutch control valve 3 F clutch latch valve 4 F clutch apply circuit 5 F clutch piston 6 F clutch assembly 7 Ring gear No...
Lincoln Aviator 2020-2025 Service Manual: Description and Operation - Passive Anti-Theft System (PATS) - Overview
Overview NOTE: This section only describes and diagnosis the Phone as a Key system. In order for the Phone as a Key system to operate, the PATS system must be functioning correctly. For more information about the PATS system Refer to: Passive Anti-Theft System (PATS) - System Operation and Component Description (419-01B Passive Anti-Theft System (PATS), Description and Operation)...
Categories
- Manuals Home
- Lincoln Aviator Owners Manual
- Lincoln Aviator Service Manual
- Drive Modes
- Child Safety Locks
- Resetting the System
- New on site
- Most important about car
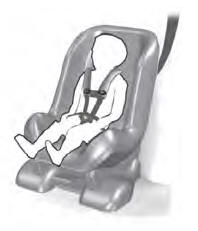
Child Seats

Use a child restraint (sometimes called an infant carrier, convertible seat, or toddler seat) for infants, toddlers and children weighing 40 lb (18 kg) or less (generally four-years-old or younger).
Using Lap and Shoulder Belts
WARNING: Do not place a rearward facing child restraint in front of an active airbag. Failure to follow this instruction could result in personal injury or death.
Copyright © 2025 www.liaviator2.com
