Lincoln Aviator 2020-2025 Service Manual / Electrical / Instrumentation and Warning Systems / Parking Aid - Vehicles With: Active Park Assist / Removal and Installation - Rear Active Park Assist Sensors
Lincoln Aviator: Parking Aid - Vehicles With: Active Park Assist / Removal and Installation - Rear Active Park Assist Sensors
Removal
NOTE: RH side shown, LH side similar.
-
With the vehicle in NEUTRAL, position it on a hoist.
Refer to: Jacking and Lifting (100-02 Jacking and Lifting, Description and Operation).
-
Remove the rear wheel and tire.
Refer to: Wheel and Tire (204-04A Wheels and Tires, Removal and Installation).
-
Remove the screws and position aside the rear wheel arch liner.
Torque: 22 lb.in (2.5 Nm)
.jpg) |
-
If equipped.
Position aside the connector shield.
.jpg) |
-
Remove the active park assist sensor.
-
Disconnect the electrical connector.
-
Release the tabs.
-
Remove the sensor from the sensor bracket.
-
Disconnect the electrical connector.
.jpg) |
Installation
NOTE: Make sure that the isolator rings are installed correctly while installing the sensors.
-
To install, reverse the removal procedure.
-
Carry out the azimuth system check.
Refer to: Azimuth System Check (413-13C Parking Aid - Vehicles With: Active Park Assist, General Procedures).
-
If any sensor fails the checks, diagnose the sensor fault.
Refer to: Parking Aid (413-13C Parking Aid - Vehicles With: Active Park Assist, Diagnosis and Testing).
 Removal and Installation - Front Active Park Assist Sensors
Removal
NOTE:
LH shown, RH similar.
With the vehicle in NEUTRAL, position it on a hoist.
Refer to: Jacking and Lifting (100-02 Jacking and Lifting, Description and Operation)...

Other information:
Lincoln Aviator 2020-2025 Service Manual: Description and Operation - Airbag and Seatbelt Pretensioner Supplemental Restraint System (SRS) - System Operation and Component Description
System Operation System Diagram - Supplemental Restraint System (SRS) Item Description 1 RCM 2 Ignition Switch 3 GWM 4 Driver Seatbelt Buckle Switch 5 Passenger Seatbelt Buckle Switch 6 RHFront Impact Severity Sensor 7 Driver Door Side Impact Sensor 8 Driver C-Pillar Side Impact Sensor 9 Passenger Belt Tension Sensor (BTS) 10 Passenger Seat Position Sensor 11 Driver Seat Position Sensor 12 APIM 13 Passenger Door Side Impact Sensor 14 BCM 15 Driver Second Row Seatbelt Buckle Switch 16 Passenger Second Row Seatbelt Buckle Switch 17 LH Front Impact Severity Sensor 18 OCSM 19 Center Second Row Seatbelt Buckle Switch 20 Passenger C-Pillar Side Impact Sensor 21 Driver Third Row Seatbelt Buckle Switch 22 Passenger Third Row Seatbelt Buckle Switch 23 IPC Item Description 1 Passenger Seatbelt Anchor Pretensioner 2 Driver Seatbelt Anchor Pretensioner 3 Driver Seatbelt Retractor Pretensioner 4 Passenger Side Curtain Airbag 5 Driver Side Curtain Airbag 6 Passenger Side Airbag 7 Driver Side Airbag 8 Passenger Airbag (Stages 1 and 2) 9 Driver Airbag (Stages 1 and 2) 10 RCM 11 BCM 12 Passenger Seatbelt Adaptive Load Limiter 13 Passenger Seatbelt Retractor Pretensioner 14 Passenger Load Limiting Retractor 15 Passenger Airbag Vent (if equipped) 16 Passenger Knee Airbag 17 Driver Knee Airbag 18 Driver Second Row Seatbelt Retractor 19 Passenger Second Row Seatbelt Retractor Network Message Chart - Supplemental Restraint System (SRS) Module Network Input Messages - RCM Broadcast Message Originating Module Message Purpose eCall confirmation APIM Used for SYNC® 911 Assist™ operation...
Lincoln Aviator 2020-2025 Service Manual: General Procedures - Cylinder Block Distortion
Special Tool(s) / General Equipment Feeler Gauge Check NOTE: Refer to the appropriate Section 303-01 for the specification. NOTE: Use a Straightedge that is calibrated by the manufacturer to be flat within 0.005 mm (0.0002 in) per running foot of length, such as Snap-On® GA438A or equivalent...
Categories
- Manuals Home
- Lincoln Aviator Owners Manual
- Lincoln Aviator Service Manual
- Interior Lamps
- Resetting the System
- USB Port and Power Point Locations
- New on site
- Most important about car
Child Seats
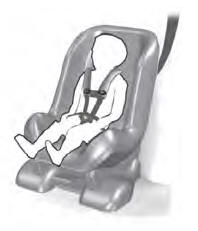
Use a child restraint (sometimes called an infant carrier, convertible seat, or toddler seat) for infants, toddlers and children weighing 40 lb (18 kg) or less (generally four-years-old or younger).
Using Lap and Shoulder Belts
WARNING: Do not place a rearward facing child restraint in front of an active airbag. Failure to follow this instruction could result in personal injury or death.
Copyright © 2025 www.liaviator2.com