Lincoln Aviator 2020-2025 Service Manual / Electrical / Electronic Feature Group / Multifunction Electronic Modules / Removal and Installation - Radio Transceiver Module (RTM)
Lincoln Aviator: Multifunction Electronic Modules / Removal and Installation - Radio Transceiver Module (RTM)
Removal
NOTE: Removal steps in this procedure may contain installation details.
-
NOTE: If installing a new module, it is necessary to upload the module configuration information to the diagnostic scan tool prior to removing the module. This information must be downloaded into the new module after installation.
Carry out the PMI procedure for the RTM.
Refer to: Module Configuration - System Operation and Component Description (418-01 Module Configuration, Description and Operation).
-
Lower the headliner.
Refer to: Headliner - Lowering (501-05 Interior Trim and Ornamentation, Removal and Installation).
-
Release the tabs and remove the RTM from the bracket.
-
Disconnect the electrical connector.
-
Disconnect the electrical connector.
.jpg) |
Installation
-
To install, reverse the removal procedure.
-
Using the previous diagnostic scan tool session, carry out the PMI procedure for the RTM.
Refer to: Module Configuration - System Operation and Component Description (418-01 Module Configuration, Description and Operation).
 Removal and Installation - Passenger Door Module (PDM)
Removal
NOTE:
Removal steps in this procedure may contain installation details.
NOTE:
If installing a new module, it is necessary to
upload the module configuration information to the diagnostic scan tool
prior to removing the module...
Other information:
Lincoln Aviator 2020-2025 Owners Manual: About SYNC
The system allows you to interact with the entertainment, information and communication systems on your vehicle using voice commands and a touchscreen. The system provides easy interaction with audio, phone, navigation, mobile apps and settings...
Lincoln Aviator 2020-2025 Service Manual: Removal and Installation - Rear Door Latch
Removal NOTE: LH (left-hand) side shown, RH (right-hand) side similar. NOTE: Removal steps in this procedure may contain installation details. NOTE: The PMI process must begin with the current door latch control module installed. If the current door latch control module does not respond to the diagnostic scan tool, the tool may prompt for As-Built Data as part of the repair...
Categories
- Manuals Home
- Lincoln Aviator Owners Manual
- Lincoln Aviator Service Manual
- Keyless Entry
- Refueling
- Locking and Unlocking
- New on site
- Most important about car
Fastening the Seatbelts
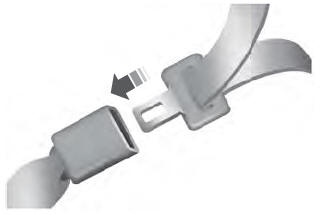
The front outboard and rear safety restraints in the vehicle are combination lap and shoulder belts.
Insert the belt tongue into the proper buckle (the buckle closest to the direction the tongue is coming from) until you hear a snap and feel it latch. Make sure that you securely fasten the tongue in the buckle.
Copyright © 2025 www.liaviator2.com

