Lincoln Aviator 2020-2025 Service Manual / Chassis / Driveline / Front Drive Axle/Differential / Removal and Installation - Axle Assembly
Lincoln Aviator: Front Drive Axle/Differential / Removal and Installation - Axle Assembly
Removal
-
Remove the front driveshaft.
Refer to: Front Driveshaft (205-01 Driveshaft, Removal and Installation).
-
Drain the front differential fluid.
Refer to: Differential Draining and Filling (205-03 Front Drive Axle/Differential, General Procedures).
-
Remove the front RH halfshaft only.
Refer to: Halfshaft (205-04 Front Drive Halfshafts, Removal and Installation).
-
Remove the engine mount RH.
Refer to: Engine Mount RH (303-01A Engine - 3.0L EcoBoost, Removal and Installation).
-
Disconnect the front drive axle speed sensor electrical connector and position the wiring harness aside.
.jpg) |
-
Disconnect the tie strap, detach and position the front axle breather hose aside.
.jpg) |
-
-
Remove and discard the front axle assembly bolts.
-
Remove the front axle assembly.
-
Remove and discard the front axle assembly bolts.
.jpg) |
-
Remove and discard the O-ring.
.jpg) |
Installation
-
NOTE: Make sure that the surface is clean and free of foreign material.
Clean and inspect the O-ring mating surface.
.jpg) |
-
NOTE: Make sure that a new O-ring seal is installed.
Install a new O-ring.
.jpg) |
-
NOTE: Make sure that the mating surface and the bore is free of corrosion and foreign material, avoid particles getting into the bore.
Clean and inspect the engine oil pan at front axle assembly mating surface.
.jpg) |
-
Install the front axle assembly and the new bolts.
Torque: 66 lb.ft (90 Nm)
.jpg) |
-
Attach the front axle breather hose and the tie strap.
.jpg) |
-
Connect the front drive axle speed sensor electrical
connector and position the wiring harness with proper routing.
.jpg) |
-
Install the engine mount RH.
Refer to: Engine Mount RH (303-01A Engine - 3.0L EcoBoost, Removal and Installation).
-
Install the front driveshaft.
Refer to: Front Driveshaft (205-01 Driveshaft, Removal and Installation).
-
Install the front RH halfshaft.
Refer to: Halfshaft (205-04 Front Drive Halfshafts, Removal and Installation).
-
Fill the front differential with clean fluid.
Refer to: Differential Draining and Filling (205-03 Front Drive Axle/Differential, General Procedures).
 General Procedures - Differential Fluid Level Check
Materials
Name
Specification
Motorcraft® SAE 75W-140 Synthetic Rear Axle LubricantXY-75W140-QL
WSL-M2C192-A
Check
With the vehicle in NEUTRAL, position it on a hoist...
 Removal and Installation - Axle Shaft Seal
Special Tool(s) /
General Equipment
205-907Handle, 32 DriverTKIT-2008DH-FLM
307-256
(T92P-77000-FH)
Installer, Differential Fluid SealTKIT-1992-FLMH/LMH
Removal
NOTE:
The stub shaft seals must be replaced whenever the halfshafts are removed...
Other information:
Lincoln Aviator 2020-2025 Service Manual: Description and Operation - About this Manual
Introduction WARNING: Before beginning any service procedure in this manual, refer to health and safety warnings in section 100-00 General Information. Failure to follow this instruction may result in serious personal injury. For additional information, refer to: Health and Safety Precautions (100-00 General Information, Description and Operation)...
Lincoln Aviator 2020-2025 Service Manual: Removal and Installation - Roof Opening Panel Seal
Removal Remove the moonroof. Refer to: Roof Opening Panel Frame (501-17 Roof Opening Panel, Removal and Installation). To remove the seal, start at the splice joint at center rear area and pull in the direction shown along the seal path instead of pulling straight out at 90 degrees...
Categories
- Manuals Home
- Lincoln Aviator Owners Manual
- Lincoln Aviator Service Manual
- Activating Intelligent Access
- USB Port and Power Point Locations
- Anti-Theft Alarm
- New on site
- Most important about car
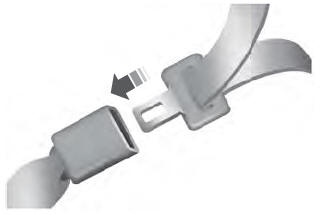
Fastening the Seatbelts
The front outboard and rear safety restraints in the vehicle are combination lap and shoulder belts.
Insert the belt tongue into the proper buckle (the buckle closest to the direction the tongue is coming from) until you hear a snap and feel it latch. Make sure that you securely fasten the tongue in the buckle.
Copyright © 2025 www.liaviator2.com
