Lincoln Aviator 2020-2025 Service Manual / Powertrain / Automatic Transmission / Automatic Transmission - 10-Speed Automatic Transmission – 10R60 / General Procedures - Transmission Fluid Exchange
Lincoln Aviator: Automatic Transmission - 10-Speed Automatic Transmission – 10R60 / General Procedures - Transmission Fluid Exchange
Special Tool(s) / General Equipment
| Fluid Exchanger |
Materials
| Name | Specification |
|---|---|
| Motorcraft® MERCON® ULV Automatic Transmission Fluid XT-12-QULV |
WSS-M2C949-A, MERCON® ULV |
Connect
NOTICE: Use transmission fluid specific for this transmission. Do not use any supplemental transmission fluid additives or cleaning agents. The use of these products can cause internal transmission components to fail, which will affect the operation of the transmission.
-
With the vehicle in NEUTRAL, position it on a hoist.
Refer to: Jacking and Lifting (100-02 Jacking and Lifting, Description and Operation).
-
Connect the Fluid Exchanger to the transmission fluid
cooler tube after the transmission fluid cooler on the return tube. This
helps remove any foreign material trapped in the transmission fluid
coolers.
Use the General Equipment: Fluid Exchanger
-
Perform the transmission fluid exchange using the Fluid Exchanger.
-
Follow the manufacturer's instructions included with the machine.
Use the General Equipment: Fluid Exchanger
Material: Motorcraft® MERCON® ULV Automatic Transmission Fluid / XT-12-QULV (WSS-M2C949-A, ) (MERCON® ULV)
-
Refer here for current material specs
Material
-
Follow the manufacturer's instructions included with the machine.
-
Once the transmission fluid exchange is completed,
disconnect the Fluid Exchanger. Reconnect any disconnected transmission
fluid cooler tubes.
Use the General Equipment: Fluid Exchanger
-
Check the transmission fluid level.
Refer to: Transmission Fluid Level Check (307-01A Automatic Transmission - 10-Speed Automatic Transmission – 10R60, General Procedures).
 General Procedures - Transmission Fluid Drain and Refill
Special Tool(s) /
General Equipment
307-570Tube, Transmission FillTKIT-2006U-F/FMTKIT-2006U-FLM/LMTKIT-2006U-ROW1TKIT-2006U-ROW2
Fluid Suction Gun
Materials
Name
Specification
Motorcraft® MERCON® ULV Automatic Transmission FluidXT-12-QULV
WSS-M2C949-A, MERCON® ULV
Draining
NOTE:
It is not necessary to remove the transmission fluid filter to drain the transmission fluid...
 General Procedures - Transmission Fluid Level Check
Check
NOTICE:
The vehicle should not be driven if the transmission fluid level is low. Internal failure could result.
NOTE:
If the vehicle has been operated for an extended period at
high highway speeds, in city traffic, during hot weather or while
pulling a trailer, the transmission fluid must cool down to obtain an
accurate reading...
Other information:
Lincoln Aviator 2020-2025 Service Manual: Removal and Installation - Rear Audio Control Module (RACM)
Removal NOTE: Removal steps in this procedure may contain installation details. NOTE: Touchscreen controls shown, analog controls are similar. NOTE: If installing a new module, it is necessary to upload the module configuration information to the scan tool prior to removing the module...
Lincoln Aviator 2020-2025 Service Manual: General Procedures - Quick Release Coupling
Disconnect NOTICE: When reusing liquid or vapor tube connections, make sure to use compressed air to remove any foreign material from the connector retaining clip area before separating from the tube or damage to the tube or connector retaining clip may occur...
Categories
- Manuals Home
- Lincoln Aviator Owners Manual
- Lincoln Aviator Service Manual
- Body and Paint
- Configuring The Head Up Display
- Description and Operation - Jacking and Lifting
- New on site
- Most important about car
Fastening the Seatbelts
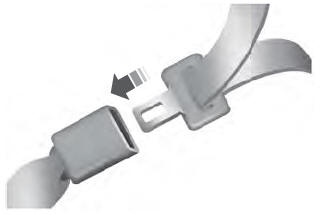
The front outboard and rear safety restraints in the vehicle are combination lap and shoulder belts.
Insert the belt tongue into the proper buckle (the buckle closest to the direction the tongue is coming from) until you hear a snap and feel it latch. Make sure that you securely fasten the tongue in the buckle.
Copyright © 2025 www.liaviator2.com
